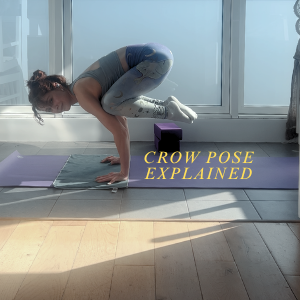
In the yoga world, crow pose (or Kakasana) is often the first arm balance people achieve and one of the most accessible ones. If you have been practicing yoga for a while and you can hold a chaturanga for more than 10 seconds, I genuinely believe crow pose is within your reach.
Crow pose can look intimidating at first. Most people think they cannot do it because they are not strong enough. In reality, the main reason is usually fear. The idea of falling onto your face stops many people before they even try. So my first advice is very simple: place a pillow in front of you. It sounds small, but removing that fear makes a big difference. The drills below will help you build the strength and awareness needed for the pose.
Which parts of the body work?
Crow pose is not only about the arms. Many parts of the body work together to make the pose stable and light.
Leg muscles
Your major leg muscles work here, both the quadriceps and hamstrings. In my observation, flexibility in these muscles also plays an important role, especially when you first move into the pose. You need enough freedom to fold forward and set up before your feet lift.
Tip: After lifting the feet, point your toes. This helps engage your thighs and quadriceps more.
Hip flexors
Your hip flexors work very actively to pull the knees in and keep them on the arms.
Tip: If you usually feel tight in the hips, it is a good idea to stretch the hip flexors regularly.
Your abs
Many people assume arm strength is the most important part of an arm balance. In my experience, the biggest improvement happens once the core becomes truly active. You need to feel that pulling sensation in the abdominal muscles.
Tip: Think of the hollow body shape in low boat pose, ardha navasana. That same feeling belongs in crow pose. And keep an active mula bandha.
Back muscles
Your back, especially the upper back, works hard to stabilize the shoulders. In crow pose we want a dome shape in the back. This naturally happens when the spine moves into flexion.
Tip: Think of cat pose, marjaryasana.
Arms
Yes, crow pose is an arm balance. But the arms are not doing everything. Your core and back do most of the work while the arms help you stay balanced.
Tip: Grip the mat with your fingertips. Feel the knuckles inside your palm pushing into the floor.
1. AB crunches

Start lying on your back. Bring your knees to the chest. Place a block between one of your thighs and the opposite elbow. Interlace your hands behind the head and lift your shoulders off the floor.
Straighten the leg without the block without touching the floor, then bring it back to the chest. Do at least 10 repetitions, then switch sides. You can repeat for several sets.
This is a great exercise to wake up and activate the abdominal muscles.
2. Reclined crow pose

This is crow pose while lying on your back. It may look easy but it is surprisingly challenging.
The key point here is to bring your knees toward your arms rather than moving your arms toward your knees. Push an imaginary floor above you with your palms. Lift the shoulders off the floor, point your toes and keep the core active.
Stay for at least 30 seconds.
3. Abs, legs and hips activation

Open your knees as wide as your mat. Feet pointed, standing on your knees. Reach your arms forward and bring the hands into kali mudra.
This is your starting position. Lean back as far as you can until you feel your quadriceps, adductors, hip flexors and abs working. Return and repeat.
Do at least 10 repetitions.
4. Modified cat and cow

Start in tabletop. Begin with your regular cow pose. As you move into cat, curl your toes under and lift your knees off the floor while bringing your nose closer to your knees.
This movement helps you understand two key elements of crow pose: pushing the floor away and doming the back.
Repeat as many times as you like.
5. Half chaturanga push ups

The name explains it well. Keep the legs, core and back active. Do not let the elbows open too wide. Draw them in toward the ribcage.
Exhale as you lower into chaturanga. Inhale back to tabletop.
This builds both arm and back strength.
6. Chaturanga push ups (optional)

If push ups are already part of your practice, full chaturanga push ups are excellent preparation for crow pose.
The two poses share many similarities: balance, pushing through the floor, active back, active legs and bent arms. The dynamics are very close.
Do as many as you can with good form.
7. Knees to nose

This movement is similar to the modified cat and cow but slightly more intense.
Place two blocks under your hands in front of your knees. Arch the back into cow pose. Then push the floor away and draw your knees toward your nose while pushing the blocks forward.
This time keep the toes pointed, which also stretches the feet.
Repeat as many times as you like.
8. Open and close knees

This is similar to knees to nose. Instead of lifting the knees upward each time you lift your hips off the floor, open and close the knees.
You can watch my Instagram video to see this drill more clearly in motion.
9. One foot crow pose

Place a block under your feet. Come into the shape of crow pose. From there, lift one foot at a time. Both heels are already lifted so you are balancing on your toes.
Move with your breath and keep your gaze forward. This drill helps you understand where you need to engage more to stay balanced.
10. Crow pose swing

Start in the same position as the previous drill. Rock forward and back on your feet without lifting them.
This helps you understand how much weight needs to shift forward rather than staying back.
General tips
Something I often observe in my students is limited hip mobility. If the hips are tight, the knees cannot come high enough onto the arms. Instead they stay on the elbows, which makes the pose less stable and harder on the joints.
Stretching the hip flexors can help a lot here. Using blocks under your feet while setting up the pose can also give you the extra height you need.
Hamstring flexibility is another helpful factor. When the back of the legs are more open, it becomes easier to fold forward and place the hands on the floor. If your hamstrings feel tight, try placing blocks under your hands.
Look forward. Do not look back at your feet or down at your hands. Your gaze helps guide your balance. When you look forward, your body naturally follows that direction.
Hands and fingers are extremely important in arm balances. Grip the mat with your fingertips. Imagine your fingers as claws that stabilize you on the floor. If you want to understand this better, you can also read my post about hasta bandha, the hand lock.
And finally, do not be afraid to fall.
Yes, sometimes you will fall onto your face. But falling is part of the process. There is no way to learn these poses without it. In many ways this is one of the most beautiful parts of asana practice. You face your fears, you make mistakes, you learn to accept imperfection and still show up.
And after a few falls, you will even learn how to fall well.

If you enjoy reading about yoga in this way, you might like my newsletter too. I share reflections from my practice, tips from my classes and occasional resources that might support your journey on the mat. You can subscribe to stay in touch. And if you ever have questions about your practice, feel free to reach out to me anytime. I am always happy to help.